Laravel Inertia.js Tutorial: Build a Modern Laravel App Step by Step


Want a Laravel application to feel like a modern frontend without building and maintaining a separate API? If coordinating Laravel, Inertia.js and Vue or React seems like too many moving parts, this laravel inertia js tutorial brings them together in a practical sequence.
Inertia connects Laravel’s server-side routes and controllers to frontend pages. Laravel remains the application backbone, while your chosen framework handles the interface. You’ll see how data reaches a page as props, then build a working example with responsive navigation and form input.
We’ll cover the architecture and setup, then work through page rendering, form submissions and validation. Along the way, you’ll learn when Inertia suits a web application and when a separate API may better fit the product or team. By the end, you’ll have a practical foundation for building a maintainable Laravel application with a responsive frontend.
Inertia.js connects Laravel to interactive frontend components, passing server-generated page data without requiring a separate API for that page flow. It doesn’t replace Laravel or Vue, React or Svelte. Instead, it connects their roles: Laravel manages routing and controllers, while the frontend framework renders the interface.
This structure is often called a modern monolith. The backend and frontend remain part of one application rather than becoming separate systems that communicate through a dedicated API. Laravel handles requests, business logic and data access; the frontend framework renders each page. For background on the framework at the centre of this architecture, see the Laravel Wikipedia page.
This division can simplify web application development. Routes and controllers stay familiar, while page components provide interactive experiences. A laravel inertia js tutorial is most useful when it makes the request flow clear, because that flow is the foundation for understanding props, forms and navigation.
Suppose a visitor opens a page showing a list of records. The browser requests a URL, Laravel matches it to a route, and the route calls a controller. The controller retrieves the relevant data and returns an Inertia response with the name of a frontend page component and the data to pass to it. The client-side adapter renders that component with the supplied props.
On an initial visit, the server returns the page within the application’s HTML response. For later Inertia navigation, the client requests the next page through Inertia and updates the view and browser history without a conventional full-page reload. Laravel’s route and controller still determine what data the visitor receives.
Inertia isn’t a frontend framework, a replacement for Laravel, or a standalone API. Vue, React or Svelte still provides the components and interaction logic; Laravel still handles server-side responsibilities. Inertia coordinates how Laravel’s page responses reach those components, avoiding the need to build a separate API solely to connect the web frontend to Laravel.
That doesn’t mean an application will never need an API. A mobile app, an external integration or a separately deployed client may need an API designed for its requirements. Inertia addresses a specific architectural choice: use Laravel’s server-side application flow to power interactive frontend pages.
The practical distinction is straightforward. If your goal is a web application with Laravel as its backbone, Inertia can connect server-side decisions to modern frontend components without splitting the project into a backend and an independent frontend. The following sections build on that model, starting with setup and then tracing data into a working page.
Start with an existing Laravel application or create a new one, then check that your PHP version meets the framework’s requirements. This example uses Laravel 13, which requires PHP 8.3, with Inertia’s Laravel adapter 3.5.1 and Vue 3 adapter 3.7.1, as reported in October 2026. Version requirements and commands can change, so consult Laravel's official documentation and Inertia’s official installation guide for instructions that match your project.
Choose Vue or React based on your team’s experience and the interface you’re building. Both can render Inertia pages; neither is the default choice for every application. If you’re considering Vue, this Vue.js frontend development guide offers useful context.
For a Vue setup, install the Laravel server adapter and Vue client adapter by following the current official instructions. This versioned example uses inertia-laravel 3.5.1 and @inertiajs/vue3 3.7.1. Inertia.js v3 also introduces the @inertiajs/vite plugin for Vite configuration. React uses its corresponding adapter. Follow the setup guide for your chosen framework to configure the root view, middleware, Vite and page resolution. These pieces need to match the adapter version.
A laravel inertia js tutorial should make the first request easy to test, not just explain the architecture. Once the dependencies and client bootstrap are in place, create a route that returns a page, then confirm the component path matches the name in the response.
In routes/web.php, add a route such as Route::get('/welcome', fn () => Inertia::render('Welcome', ['message' => 'Your first Inertia page']));. Add the PHP import statement use Inertia\Inertia; at the top of the file. This route returns a page called Welcome with a message prop. In a larger application, put the route logic in a controller; the page response follows the same pattern.
Next, create the matching Vue page at the location configured by your Vite page resolver, commonly resources/js/Pages/Welcome.vue. It can display the supplied prop with a template such as <template><h1>{{ message }}</h1></template> and declare it with defineProps(['message']). The directory and bootstrap syntax depend on your project’s configuration, so make sure the names align.
If the page fails, check the route, component name, page resolver and Vite configuration first. A working setup gives future pages a reliable foundation. For a custom application that needs coordinated Laravel and frontend implementation, bespoke Laravel development can shape the architecture around its requirements.
Turn the first page into a small task list. Laravel selects records and handles changes, Inertia carries page data and requests, and the frontend displays the list and form. This laravel inertia js tutorial uses Vue 3 with the Inertia Vue adapter. The same pattern works with React, using the corresponding components and hooks in its adapter.
In a controller, query only the fields the page needs, then pass the results to the matching page component. For example, the index action can return Inertia::render('Tasks/Index', ['tasks' => Task::query()->select('id', 'title', 'completed')->latest()->get()]). The component receives tasks as a prop, which Vue can declare with defineProps<{ tasks: { id: number; title: string; completed: boolean }[] }>().
Be deliberate about the data boundary. Send the fields needed to render the page, not entire model records by default. Never expose credentials, private notes or other sensitive data as props: anything sent to the browser can be inspected by the user. For large lists, consider pagination instead of passing every record at once.
Use Inertia’s Link component for internal navigation. In the Vue page, import it from @inertiajs/vue3 and write <Link href="/tasks">Tasks</Link>. This keeps navigation within the Inertia page flow rather than triggering a standard full-page visit.
For the form, Vue’s useForm helper tracks values, submission state and validation errors. A compact example is const form = useForm({ title: '' }), followed by form.post('/tasks', { onSuccess: () => form.reset('title') }). Bind a text input to form.title, show form.errors.title beside it, and use form.wasSuccessful to display a success message after a successful response.
On the Laravel side, add a POST route and validate the form before creating a task. For example, use $validated = $request->validate(['title' => ['required', 'string', 'max:120']]), then create the record from the validated data and redirect to the task list. Make sure the model allows the validated field for mass assignment. If validation fails, Laravel redirects back with errors; Inertia returns them to the form, where the adapter exposes them through form.errors. The visitor can see what needs fixing and submit again without losing context.
Keep feedback close to the action. Show field errors beside their inputs, disable or relabel the submit button while a request is processing, and confirm success without relying on colour alone. This gives you a complete, server-validated interaction, with data rules in Laravel and presentation in the page component.
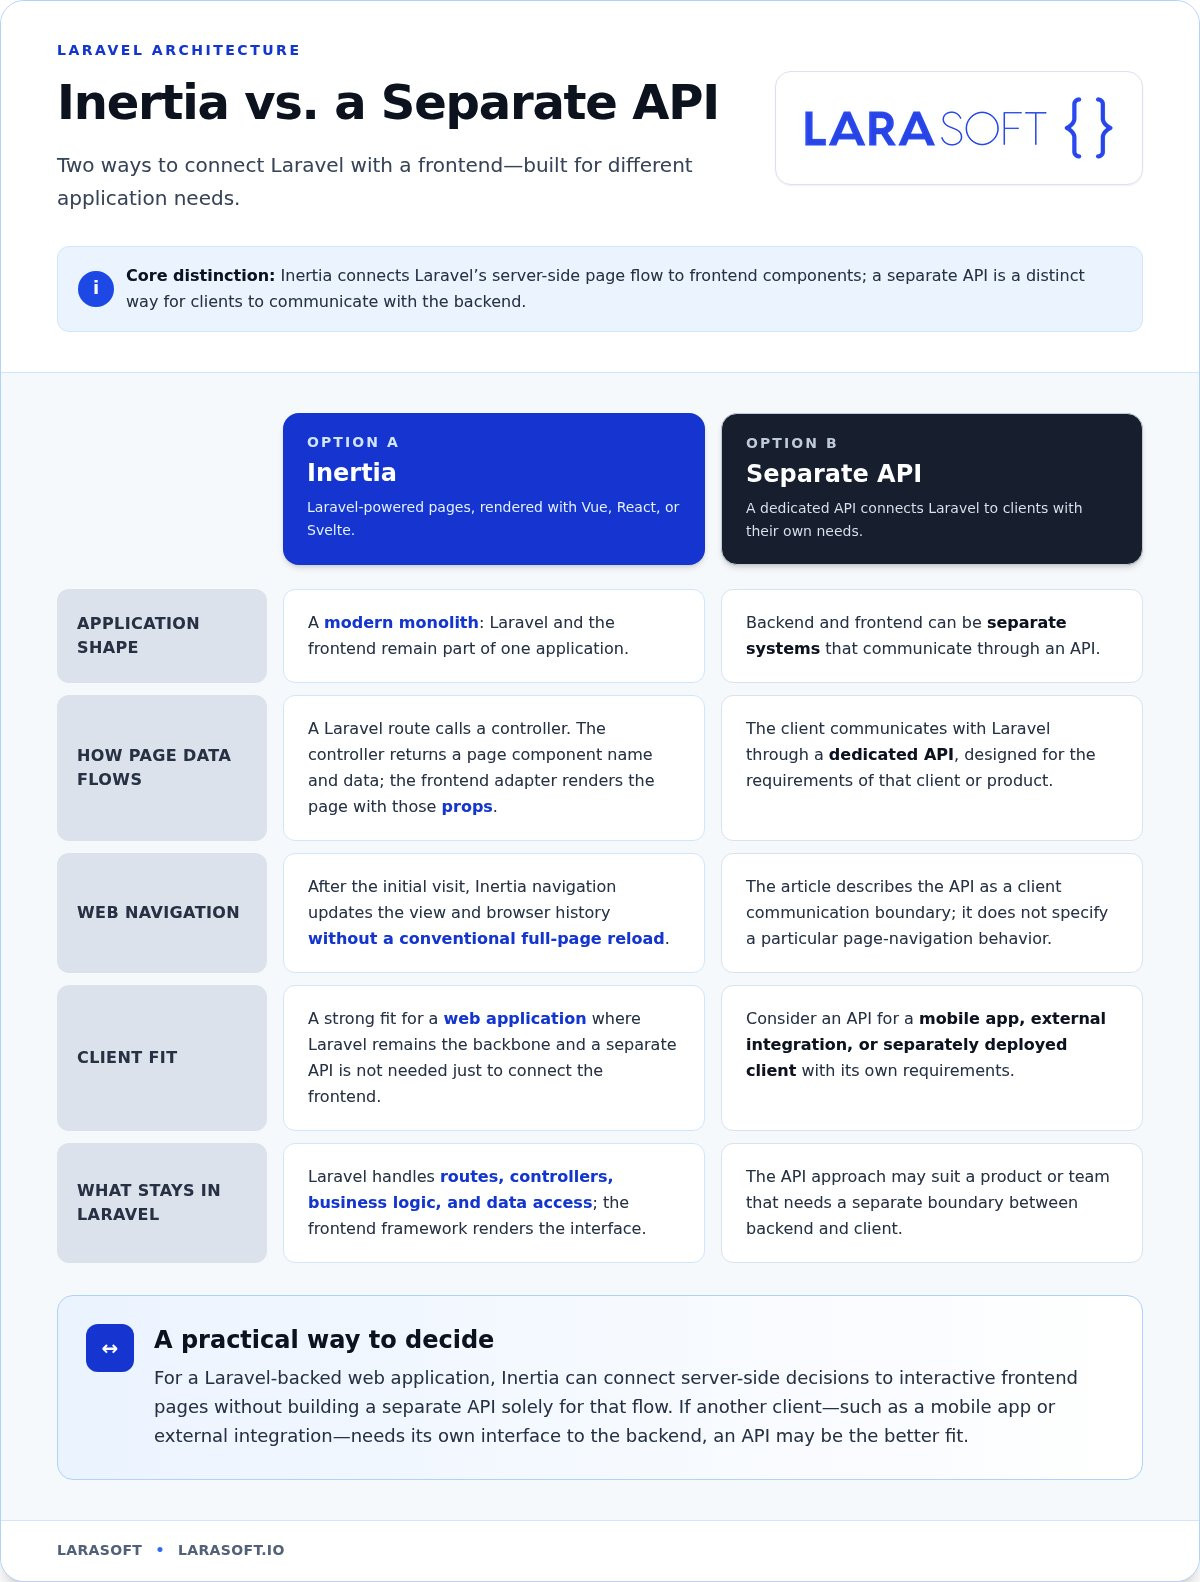
Inertia and a separate API solve different architectural problems. Inertia connects Laravel to frontend pages within one application flow. A separate API creates a backend contract that can serve independently developed clients. Neither approach is automatically simpler or more capable. Choose based on who needs the data, how the application is deployed and how the team works.
Decision rule: choose Inertia when Laravel will power a web-focused product and the frontend can share its application workflow. Choose a separate API when multiple independent clients or deployment boundaries need a stable backend contract.
| Consideration | Inertia pages | Separate API |
|---|---|---|
| Clients | Primarily a web frontend | Multiple or independently built clients |
| Deployment | Laravel and frontend managed together | Frontend and backend can deploy separately |
| Workflow | Shared Laravel routes, controllers and page data | API contract and client integration managed explicitly |
| Authentication | Often shares the web application’s session flow | Designed around the needs of each API client |
Inertia suits applications where Laravel can own routing, backend logic and the data supplied to each page. A web-based booking system, for example, could use Laravel controllers for core workflows and Vue or React components for interactive search and booking screens. The team can work within one application structure without building a separate API just to connect the frontend. That can reduce duplicated boundaries, but still requires clear organisation and testing.
Consider a separate API when a web frontend, mobile app and external integration all need a shared backend contract, or when frontend and backend teams must deploy and govern their work independently. An API boundary defines how clients exchange data without tying them to Inertia page responses. Inertia isn’t limited to small applications: it can support substantial web products when its unified workflow fits the product’s needs.
The trade-off is operational as well as technical. Separate deployments can give teams independent release cycles, but they also require teams to define, document and maintain the API contract, including authentication and error-handling expectations for each client. Inertia keeps page interactions closer to Laravel, though an application can still expose APIs where integrations or other clients need them.
Use this laravel inertia js tutorial as a starting point, then test the choice against your roadmap. List every client, identify deployment boundaries, and clarify which team owns each interface. For a bespoke Laravel application, Larasoft can help align the backend and frontend architecture with those requirements. Plan your Laravel application architecture.
A page that works locally is only the start. Before release, test the full journey: Laravel authorises and validates requests, Inertia carries page responses, and the frontend gives clear feedback when people interact with the application. Use the laravel inertia js tutorial example as a foundation, then test it with the real data, users and workflows your product will support.
Test successful and unsuccessful form submissions, including empty values and invalid input. Confirm that validation messages appear beside the relevant fields, success states are clear, and navigation leads to the expected page. Check that loading feedback appears during slower requests and that repeated submissions don’t trigger unintended duplicate actions.
Access control belongs on the Laravel side. Hiding a button in Vue or React may improve the interface, but it doesn’t prevent a user from making a request directly. Protect routes and actions with appropriate server-side authorisation checks, then verify that users without permission can’t retrieve or change restricted data.
Before deployment, follow the current Laravel and Inertia adapter documentation for production configuration. Check that environment settings are appropriate, build frontend assets using the project’s configured production build command, and test the deployed application rather than relying only on a local development server. Include these checks in the release process so they’re repeated consistently.
As the application grows, keep route and controller responsibilities clear, move substantial business rules out of page components, and focus frontend components on presenting and collecting information. Add tests for important Laravel behaviour and user journeys, including validation, access control and navigation. Regular maintenance helps keep dependencies, server responses and frontend expectations aligned as the product changes.
Inertia can remain a sound choice for a substantial web application. If the product later needs independent clients, external integrations or a separately governed API, treat those as deliberate architecture needs and define the boundary accordingly. Base that decision on actual workflows and future plans. The Laravel development agency guide offers further considerations for planning that work.
With these checks in place, you have a stronger basis for building beyond the tutorial. For a bespoke Laravel application with a Vue or React frontend, explore Larasoft’s Laravel development services.
Apply the architecture to a real product workflow next. Start with one well-defined feature, then use testing and user feedback to guide your next development decisions. A sound foundation should make change manageable, not lock the application into a single release or narrow use case.
This laravel inertia js tutorial gives you a practical starting point. As the product develops, keep its Laravel structure, frontend experience and maintenance needs aligned. Larasoft combines custom Laravel application development, Vue.js and React frontend expertise, and ongoing software maintenance to support that longer-term view.
If you’re planning a bespoke application or deciding how to shape an existing one, explore Larasoft’s Laravel development services. Build deliberately, keep future needs in view, and let each well-structured step move your product forward.
No. Inertia can serve a web frontend through Laravel routes and controller responses, so you don’t need a separate API just to pass page data to Vue or React. You can still add API endpoints for needs such as a third-party integration or mobile client. In this laravel inertia js tutorial pattern, keep each endpoint’s purpose clear so page responses and API contracts remain easy to maintain.
Yes. Inertia has an official React adapter, so you can build page components with React instead of Vue. Choose the adapter that fits your team’s skills and project conventions, then align its dependencies, Vite setup and page resolver with the Laravel adapter. Don’t mix setup instructions from different framework adapters: the client bootstrap and component syntax differ, even though the server-side page flow is similar.
Yes. You can integrate Inertia into an existing Laravel project, but plan the change around its routes, views, authentication and frontend build configuration. Start with one route and page rather than converting the whole application at once. This helps you see how the adapter fits with existing middleware and assets, and resolve configuration conflicts before extending the pattern to other parts of the application.
Yes. Inertia supports server-side rendering, but it requires additional configuration beyond a standard client-rendered setup. SSR can make initial page content available in the server response, which may matter for search visibility or perceived loading, depending on the product. Review the current Inertia and adapter documentation for supported SSR setup, then test the pages that need it. Not every application requires SSR, so base the decision on actual content and performance needs.
It can be. Application size alone doesn’t determine whether Inertia is appropriate; clear boundaries and consistent practices matter more. Organise routes, controllers and frontend components by feature, keep business rules in suitable Laravel layers, and avoid sending unnecessary page data. As needs evolve, you can introduce APIs for specific clients or integrations without assuming every page needs one. Review the architecture as the product grows instead of adding complexity before a real requirement appears.
Authentication is generally handled by Laravel, using the application’s chosen authentication setup, middleware and authorisation rules. Inertia pages can receive the current user or other shared data needed to shape the interface, but expose only fields the page genuinely needs. Protect sensitive routes and actions on the server; hiding a link in the frontend isn’t access control. A mobile app or external client may need a separate API-oriented authentication design.
Start with the browser console and Laravel logs. Confirm the route responds and the controller’s page name matches the component path expected by the resolver. Check that the adapter and Vite plugin are installed and configured consistently, and that the development asset process is running. A blank screen can also result from a JavaScript error inside the component. After correcting the issue, load the route directly as well as navigating to it from another page.
Here’s what we've been up to recently.
Certified Quality. Great Prices